|
Note: this article will be split into a series of shorter articles in the future (about 5 or 6). The updated series will include an updated discussion of Battle Pets - how they should be used on Turn 1, how they affect your mana curve and how both players should position around the semi-random nature of Battle Pets' target priority.
Duelyst has a reasonably gentle learning curve – since it has a small card pool and uses prediction and positioning as a source of depth rather than inherently complicated rules, you can easily learn the fundamentals of Duelyst within your first day of experimenting. Being a great player requires a lot of practise and familiarity with the options that your opponents are likely to choose, but becoming a good player is much easier in Duelyst than for most other CCGs. However, one skill that’s extremely important for new players to learn is card evaluation. Judging how strong the cards in your collection are – and which ones are most useful together – requires that you understand several interlocking elements of Duelyst’s design, such as the amount of mana that you normally have within the first few turns and which stat thresholds (such as 2 health vs 3 health) are especially important. Understanding why particular cards are stronger than others is one of the main skill barriers when jumping into your first game of PvP Duelyst – the default decks that you’re provided with are good enough to learn the basic rules of Duelyst, but your early PvP experience will be much more enjoyable and put much more control into your hands if you’re using a well-rounded deck rather than a showcase of miscellaneous cards. Rather than simply listing which Basic and Common cards are especially powerful, I wanted to use these articles to explain why those cards are used in successful decks – how the fundamental nature of Duelyst means that particular cards become stronger than average, as well as which cards are less powerful than they would seem because of exploitable weaknesses or competition for deck space with other cards at the same mana cost. Since this is going to involve a lot of writing, I’ll be spreading these explanations across a series of 6 articles. The Plan of Attack
In this article (The Opening Moves), I’ll explain the common opening plays that occur over the first 4 turns of a typical game of Duelyst. The location of the mana springs on the map has an enormous influence over the course of the game, since they allow the players who claim them to summon powerful minions within the first few turns. Both players will normally fight to contest the mana springs over the first few turns and the distribution of mana costs in your deck (your mana curve) should be crafted to exploit the mana springs as much as possible.
In the second article (The Deck Archetypes), I’ll examine the five main archetypes in Duelyst – aggro, midrange, control, tempo and the elusively-defined ‘combo’ decks. Each archetypes represents a different strategy for winning a game of Duelyst – one person could build their deck around sieging the opponent and stalling into powerful late-game spells, while another person could build their deck around swarming the opponent and rushing them down before they can accumulate enough mana to cast their late-game spells. Although these archetypes are not mutually exclusive, most decks will be built with one particular win condition (and therefore an archetype) in mind – understanding which cards synergise with particular archetypes is enormously important for building your first deck. In my third article (The Golems), I’ll examine the 6 Basic minions with the most efficient stat lines for their mana cost – the Golems. These effect-less minions serve as the benchmark to evaluate every other minion in the game, since any minion with lower stats than the equally-priced Golem needs a strong enough effect to compensate for their reduced combat effectiveness. In the last three articles in the series (1-2 Mana Minions and so forth), I’ll examine all of the neutral minions which new players can easily access within their first few hours of gameplay, explaining which factors makes those specific minions stronger or weaker than average in particular decks. Almost all of the minions discussed will either be Basic (free) or Common (lowest rarity), along with a handful of Rare minions (second-lowest rarity) which have been included because they’re powerful or flexible enough to be used competitive in several different factions. The fourth article will cover 1-2 mana minions, while the fifth will cover 3-4 mana minions and the sixth will cover 5-7 mana minions. As fair warning, each of these articles is going to be reasonably bulky – this one clocks in around 5000 words, so you might want to brew some tea and make yourself comfortable. Ready? Then let’s get cracking. Turn 0 - The Empty Board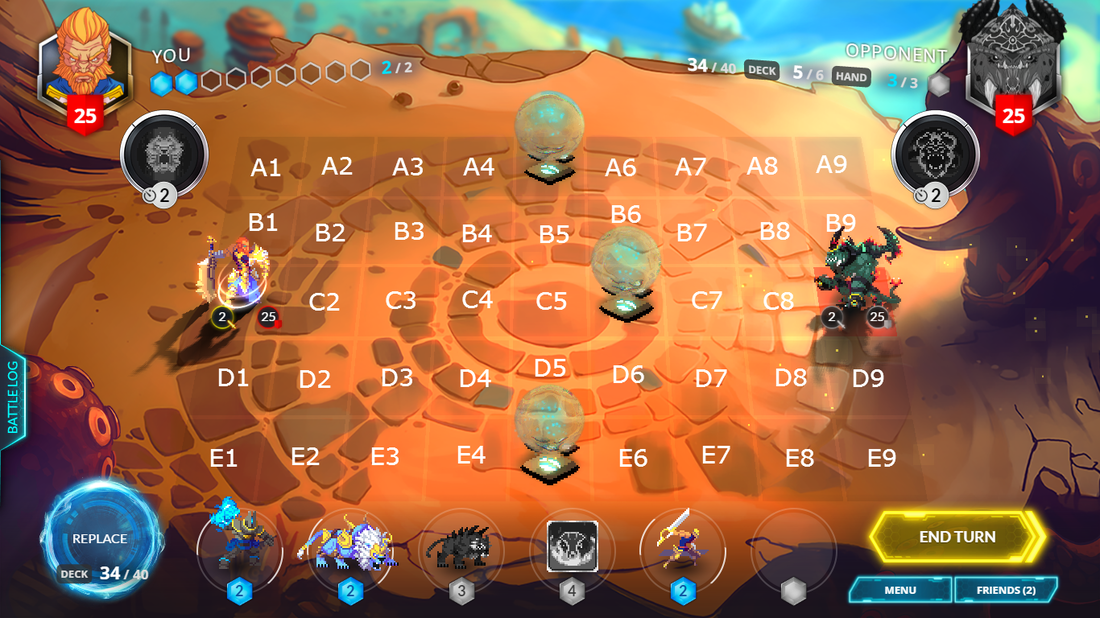
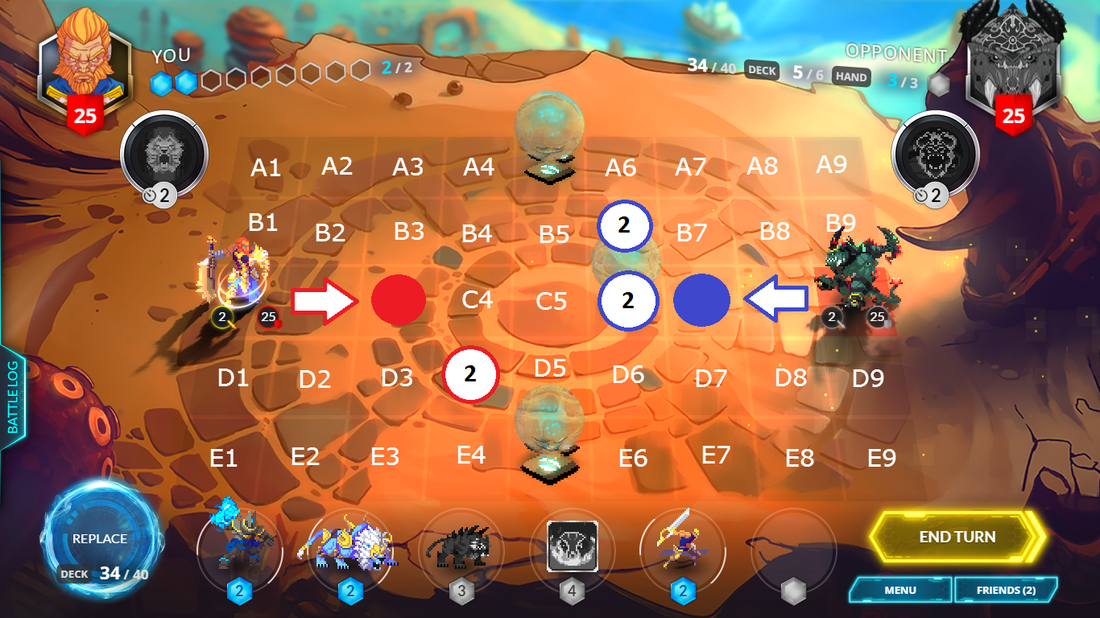
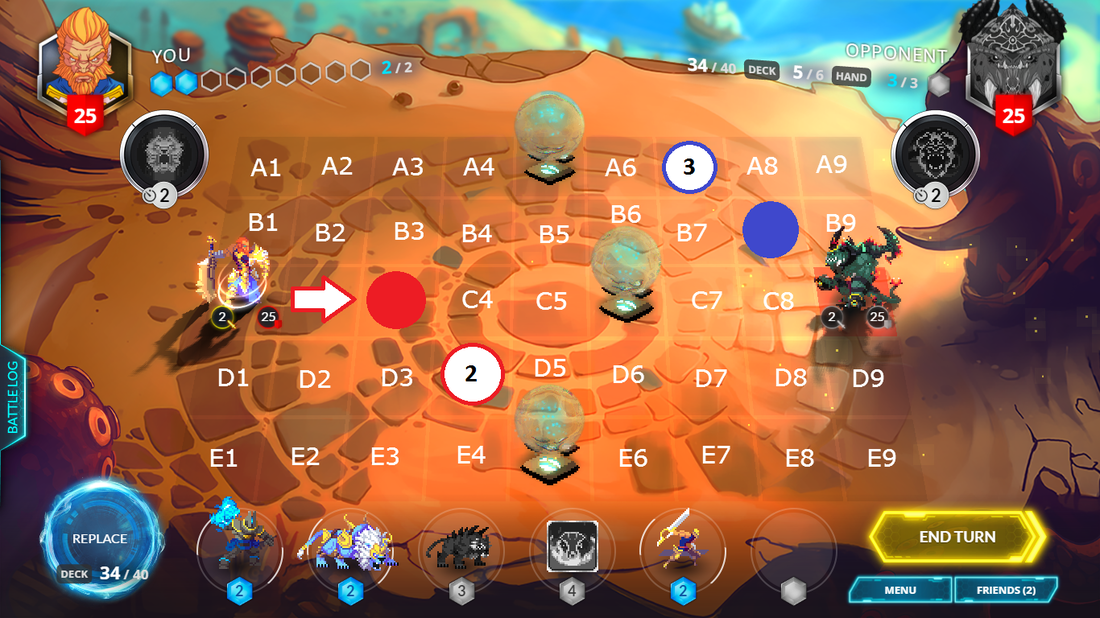
This is how a game of Duelyst looks at the beginning of Turn 1 (minus the annotations) – two generals placed at opposite ends of a 9x5 grid, with three blue orbs (mana springs) positioned near the centre of the map on A5, E5 and C6. These mana springs are permanently consumed whenever a unit is either summoned onto the space or ends their movement on that space, providing the player controlling that unit with a temporary point of bonus mana which can only be spent during that turn. Each unit can move two spaces horizontally or vertically per action unless stated otherwise (diagonal moves count as 2 successive horizontal and vertical moves), travelling through allied units freely and attacking units in any of the surrounding spaces (including the diagonals). Similarly, players can summon new minions on any of the spaces in contact with an allied minion or general (including the diagonals) – movement is the only action which has diagonal restrictions.
Using the standard opening move as an example, Player 1 could move their general forwards from C1 to C3 on the first turn, then diagonally summon a 2-mana minion onto either B4 or D4 (which are functionally identical). This leaves an allied unit (your 2-mana minion) within a single diagonal movement of the mana spring at either A5 or E5 respectively, allowing Player 1 to move their unit onto the mana spring on Turn 2 and use the additional mana to summon more powerful minions. One of the most fundamental aspects of Duelyst’s design is that minions become exponentially more cost-efficient as their mana cost increases – because expensive units have the opportunity cost of not being playable during the first few turns of the game, you get rewarded for casting them with increasingly powerful cards. Summoning a powerful minion an entire turn earlier than normal not only allows that minion to influence the game for longer (and therefore tip the game further in your favour), but also allows your powerful minion to pick apart numerous smaller minions summoned by your opponent before they have enough mana to effectively answer your threat. This means that claiming the mana springs and leveraging the short-term mana acceleration which they provide into long-term board control is one of the most important elements of competitive Duelyst. The asymmetric position of the mana springs on the map is designed to reduce the impact of first-turn advantage. Player 1 has earlier access to the A5 and E5 mana springs (since they can move a unit onto them at the start of Turn 2) and can also summon minions first, which allows Player 1 to make better use of cards that require minions to already be on the board (such as buffs or healing effects) and gives them the first opportunity to declare favourable attacks against the opponent. To compensate for this, Player 2 has an additional point of mana on each turn during the early stages of the game (until both player reach 9 mana) and can additionally choose to place minions directly onto the C6 mana spring on Turn 1. This allows Player 2 to develop a larger board presence in order to compensate for Player 1’s ability to pick the most favourable battles, as well as allowing Player 2 to reach particular tipping points (such as 5 mana) much earlier than Player 1. The large greyed-out buttons next to each general’s portrait are the generals’ Bloodborn Spells. These activated abilities become unlocked every other turn from Turn 3 onwards (Turn 3, Turn 5, Turn 7, etc) and can be activated once per turn by spending 1 mana. Bloodborn Spells always come off cooldown on the same turns regardless of which turn you used them on – your Bloodborn Spell will always become available on Turn 5 regardless of whether you activated it on Turn 3, Turn 4 or not at all. Each general’s Bloodborn Spell is unique – some are utility effects which are mainly used to spend any excess mana, while other Bloodborn Spells are integral to the general’s strategy and will normally be used as soon as they come off cooldown if the player can spare enough mana. Players need to plan around using their Bloodborn Spells when budgeting how much mana they plan to spend each turn, which means that it also needs to be accounted for when evaluating minions and constructing the mana curve of your decks. With that broad overview out of the way, let’s take a closer look at a handful of specific opening moves. Player 1 - The Opening Moves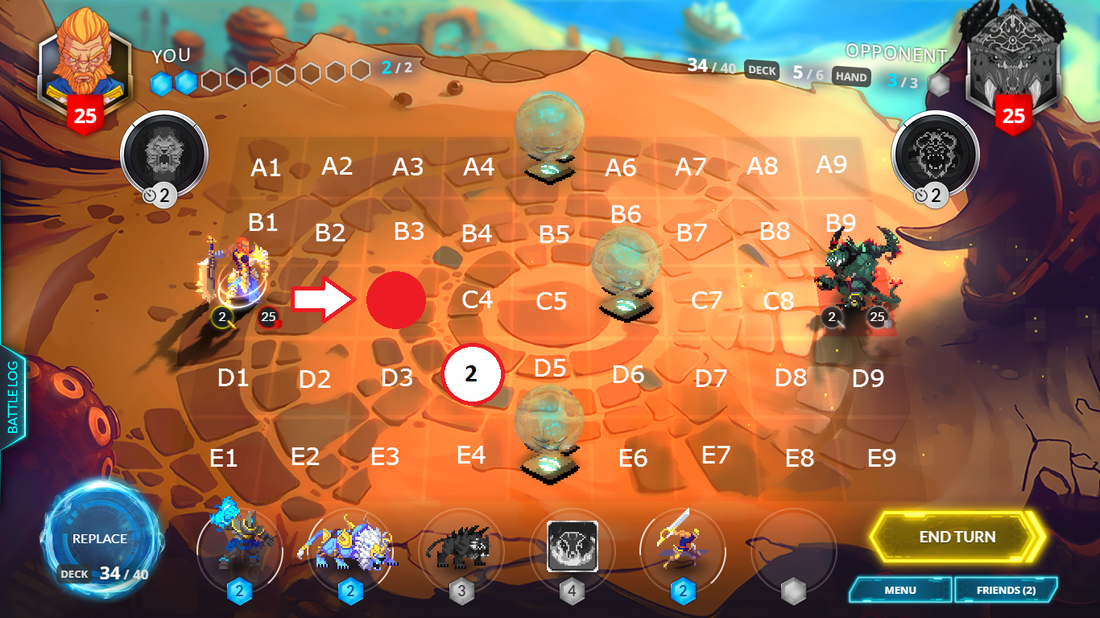
The range of possible moves across the first 3-4 turns of a typical game of Duelyst is enormous. Each faction and each strategy within those factions is built around a different selection of minions and spells - some plan to summon multiple minions per turn and aggressively burn through the opponent's life total with efficient 2-mana minions, while others plan to consistently clear the board using spells or summon 4-5 mana minions every turn to gradually flatten the opponent through relentless pressure. In order to remain concise, this article will zoom in on a handful of common opening moves in order to show the importance of particular mana costs during the first 3-4 turns of the game.
As explained in the previous section, the standard opening move for Player 1 is to move their general forwards to C3 and summon a 2-mana minion on either B4 or D4. If this minion is not removed by Player 2, then Player 1 can summon a 4-mana minion on Turn 2 by moving their minion onto the mana spring, then either summon another 4-mana minion on Turn 3 without needing a mana spring or alternatively summon a 3-mana minion and activate their Bloodborn Spell using the excess mana. Because the Bloodborn Spell will always come off cooldown on Turn 5 regardless of whether it was used on Turn 3 or Turn 4, choosing whether to use the Bloodborn Spell on Turn 3 then influences your options on Turn 4. With 5 mana available on Turn 4, Player 1 can either choose to summon a 5-mana minion (which will normally be the most cost-efficient option) or alternatively cast yet another 4-mana minion and activate their Bloodborn Spell with the excess mana if they chose to spend all of their mana on a 4-mana minion on Turn 3. Assuming that your strategy favours playing the largest minion in your hand each turn while still using your Bloodborn Spell before it comes off cooldown, this means that Player 1's options can be simplified down to the following:
The most important message here is that 3-mana minions are not especially important for Player 1's early game if your goal is simply to play the largest possible minion every turn. 3-mana minions become more important if Player 2 can destroy the minion that you played on Turn 1 during their first turn (since this prevents you from moving a unit onto a mana spring and summoning a 4-mana minion), but the sheer power offered by most 4-mana minions compared to most 3-mana minions means that summoning a 4-mana minion is usually better unless you have a 3-mana minion with an especially relevant effect.
On the other hand, if your goal is to summon multiple minions at once and overwhelm your opponent's ability to deal with individual threats, then 3-mana minions become substantially more useful. Assuming that you placed your Turn 1 minion on D4, you can choose to move your Turn 1 minion onto the E5 mana spring and move your general diagonally to B4. With 4 mana available after claiming the E5 mana spring, you can either choose to summon a 4-mana minion or summon a 3-mana minion onto the A5 mana spring and another 2-mana minion next to any of your allied units (or visa versa) in order to rush out numerous threats at once. If your deck has an abundance of 2-mana spells which are useful during the early stages of the game, then casting a 3-mana minion and a 2-mana spell would also be another powerful approach. This information strongly affects the way that we evaluate minions of different mana costs in terms of their impact during the first few turns. Regardless of your overall strategy, almost every deck in Duelyst is constructed around a core of efficient 2-mana minions. Player 2 is given an enormous advantage in terms of mana acceleration to compensate for Player 1's ability to contest the mana springs on Turn 2 using a 2-mana minion - failing to summon a 2-mana minion on Turn 1 nullifies that advantage and can potentially place Player 1 at an enormous disadvantage, meaning that most decks run around 8-10 minions that can be summoned on Turn 1 in order to have a roughly 90% chance of summoning a minion on Turn 1. 3-mana minions have two main advantages for Player 1. Firstly, they can be cast alongside your Bloodborn Spell on Turn 3 to curve neatly into a 5-mana minion on Turn 4. Several 3-mana minions such as Saberspine Tiger and Displacer Beast become substantially more dangerous when used alongside a synergistic Bloodborn Power, while other faction-specific cards such as Silverguard Knight and Sojourner are simply valuable minions which provide a convenient opportunity to use your Bloodborn Spell. Secondly, they allow you to rapidly develop your board by summoning a 2-mana minion and a 3-mana minion on Turn 2 (as explained above), which is extremely advantageous if you intend to play aggressively or suspect that your opponent has strong single-target answers but can't easily answer multiple minions in one turn. In contrast, 4-mana minions form the backbone of midrange decks that want to establish board control by slamming multiple powerful minions onto the board - running a solid number of both 2-drops and 4-drops allows you to consistently summon a 4-mana minion on Turn 2, which can be followed by a steady barrage of 4-mana minions across the following turns and more expensive minions whenever you happen to draw them. It's somewhat rare that simply casting 4-mana minions every turn will actually be the optimal play, since your opponent will presumably be casting threats that require removal spells or specialized answers, but an abundance of beefy 4-mana minions is still an effective core to build your first deck around. 5-mana minions and especially 6-mana minions suffer from the fact that you can't cast them on Turn 2 as Player 1 and can't cast them alongside another spell until much later in the game - any minion above 4 mana inherently have the opportunity cost of slowing down your board development, so most of the powerful ones compensate for this by having an enormous influence on the board on their own. 7-mana minions tend to be overkill unless your deck is fundamentally built around having a more powerful late game than anything else that you're likely to face (to be discussed further in a future article series), which means that the majority of decks don't run any minions which cost more than 6 mana.
It's also worth mentioning at this stage that minions that can attack your opponent from a distance (using either the Ranged or Blast keyword) are an exception to this general trend - Turn 1 Ranged minions are usually played on either B1 or D1 before your general moves in order to keep them as far away from your opponent's minions as possible, while Blast minions are normally played on B3 (in the central row) so that they can move up or down to shoot opponents' units in any given row. These defensive positions mean that you forfeit the opportunity to accelerate into a 4-mana minion in exchange for chipping down your opponent's units from range, which can potentially allow you to control the board through attrition rather than summoning inherently stronger minions. The same options are equally true for Player 2, with the minor exception that Player 2 can move forwards and place a melee minion on the C6 mana spring, then place a Ranged or Blast minion on C8 behind them. I don't want to go into too much depth about Ranged minions in this article, since relatively few decks use Ranged or Blast minions, but it's worth emphasizing that placing these minions defensively is usually worth losing access to the mana springs on Turn 2.
Player 2 - The Opening Moves
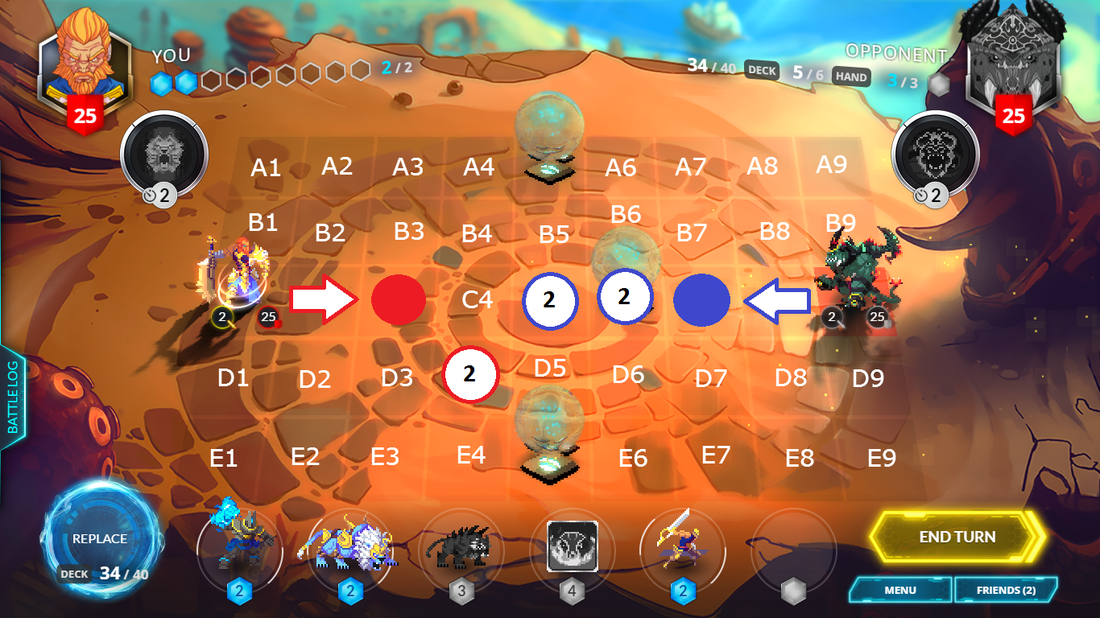
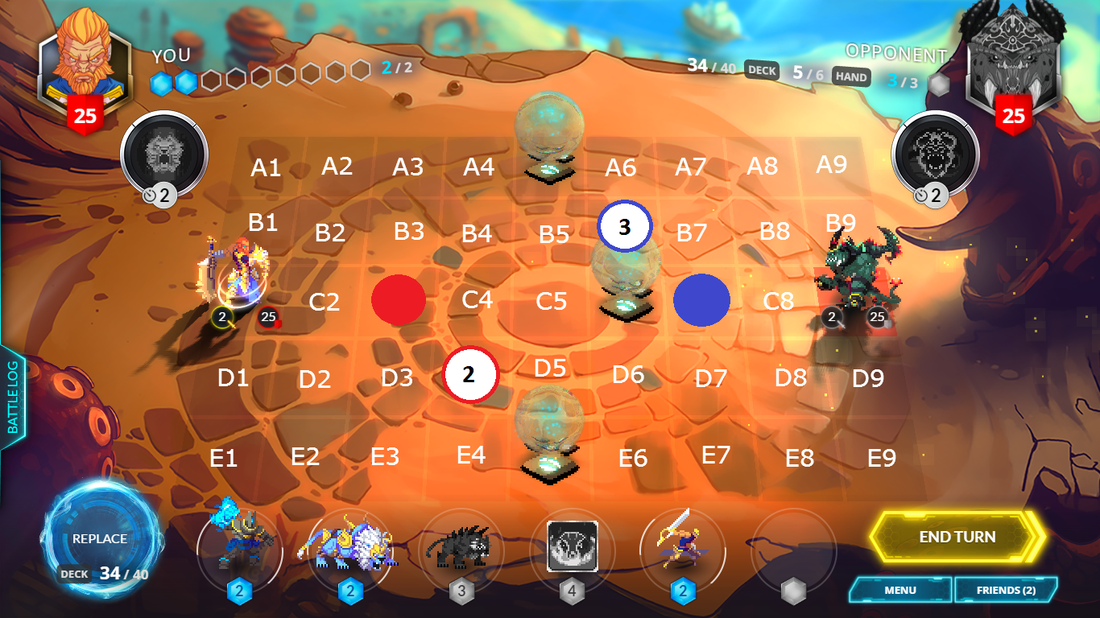
On the other hand, the decision trees are far more interesting for Player 2. Because they start the game with 3 mana and can summon a minion directly onto the C6 mana on Turn 1, they can either choose to summon a pair of 2-mana minions on Turn 1 (often substituting the second minion for a 2-mana spell) or summon a 3-mana minion which is individually stronger than Player 1's minion but doesn't fully exploit the mana available to them. Because most decks needs a reasonably large number of 2-mana minions for those occasions when you happen to be Player 1, it's common for Player 2 to summon a pair of 2-mana minions on Turn 1 - assuming for now that Player's 2 hand makes this the strongest option, they have two main options for placing their minions (shown in the pictures above) that both allow Player 2's second minion to walk directly onto the A5 mana spring if Player 1 chooses not to claim it.
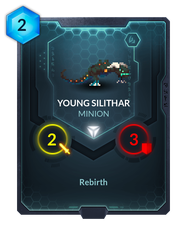
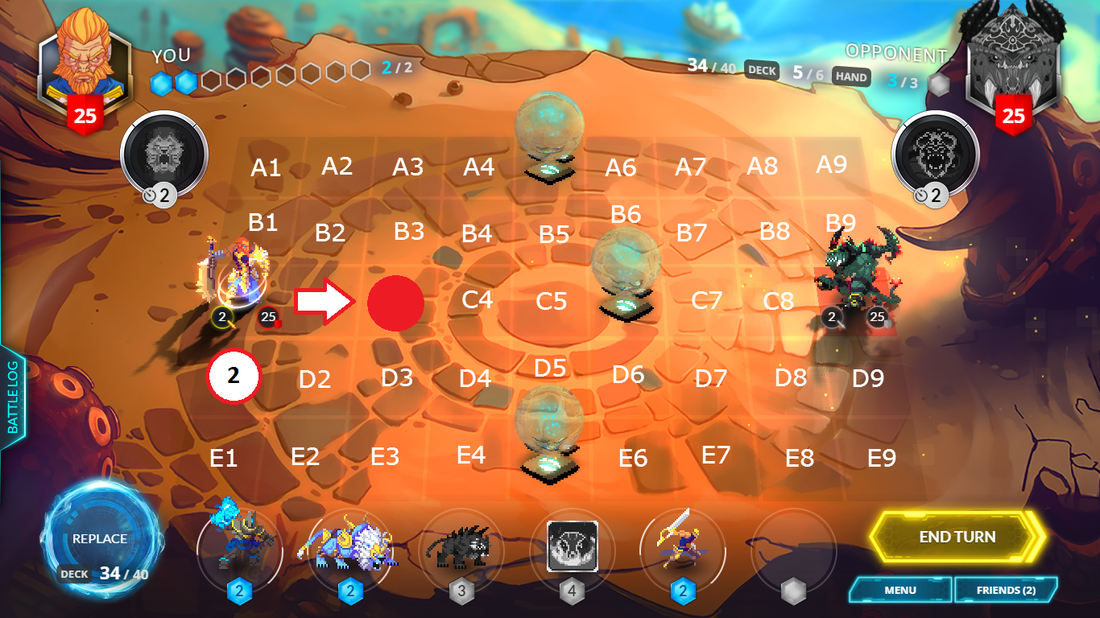
In the first example, Player 2 summons their second 2-mana minion on B6, vertically above the mana spring at C6. Because Player 1's general and their 2-mana minion would both need to move onto C5 in order to enter melee range of the minion on B6, this option makes it harder for Player 1 to destroy Player 2's second minion through combat before it can claim the A5 mana spring. This forces Player 1 to choose between claiming the mana spring on Turn 2 as a denial strategy (often wasting the free mana) or run the risk of Player 2 claiming the mana spring and summoning a 5-mana minion on Turn 2. The amount of board control that a 5-mana minion can generate on Turn 2 is enormous (which will be demonstrated in Part 5), which is precisely why your opponent won't usually allow this to happen. In the second example, the second minion is placed aggressively on C5. While this position potentially allows your second minion to claim either of the central mana springs, it's reasonably easy for Player 1 to either claim both mana springs regardless or claim one mana spring (E5 in this example) and summon their 4-mana minion on B5 to prevent Player 2's second minion from walking onto the A5 mana spring. Furthermore, Player 1 has the option of simply attacking Player 2's second minion with both their general and their own 2-mana minion without moving their minion onto the E5 mana spring. They can follow this by summoning a pair of 2-mana minions in order to develop their board - this gives them the option of denying the remaining mana springs by summoning one minion directly onto the E5 mana spring, moving their general to B4 and placing their second minion on the A5 mana spring. As such, this opening play isn't designed for maximum control over the mana springs. Instead, placing one of your 2-mana minions on C5 allows that minion to control movement through the centre of the board - it prevents Player 1 from attacking the minion on the C6 mana spring with both their minion and their general together, as well as allowing the central minion to travel across and attack units across the largest possible area of the board. As a convenient example, Young Silithar (a 2/3 Magmar minion with Rebirth) turns into a 0/1 Egg when it is destroyed - if your opponent isn't able to destroy that minion before the end of your next turn, then the Egg will hatch into a fully-healed Young Silithar. Because both Player 1's general and their 2-mana minion will usually have 2 power (more on that later), Player 1 normally needs to play another card to destroy Young Silithar and its Egg on Turn 2 - if your opponent chooses not to clear your Young Silithar on C5, then it's in the perfect position to move across the map and attack the unit of your choice after receiving a buff. There are many situations where this aggressive opening play is favourable, but they usually depend on the specific 2-mana minions in your deck, so I won't attempt to cover them all.
One of the neat little quirks of Duelyst's design is that Player 2 can spend an odd amount of mana whenever their Bloodborn Spell comes off cooldown and an even amount of mana on every other turn - this means that building your deck around a core of powerful 2-mana minions and 4-mana minions allows you to consistently spend your mana efficiently every turn. Although the opportunity to cast powerful 5-mana minions during the second and third turns of the game is exceptionally powerful, those 5-mana minions are much slower to cast during the games where you happen to be Player 1 - saturating your deck with too many 5-mana minions can result in some games where you simply don't have many options during the first few turns, whereas replacing some of those 5-mana minions with 4-mana minions allows you to consistently cast powerful minions regardless of which side of the board you start on. It's worth emphasizing that this isn't a reason to avoid running 5-mana minions altogether - this is the reason why 5-mana minions are so much stronger than their equivalent 4-mana minions. But if you plan around establishing early control over the board using durable minions, then 2-mana minions and 4-mana minions are what provide the consistent board presence for you to leverage over the following turns.
Player 2 - The 3-Mana Options
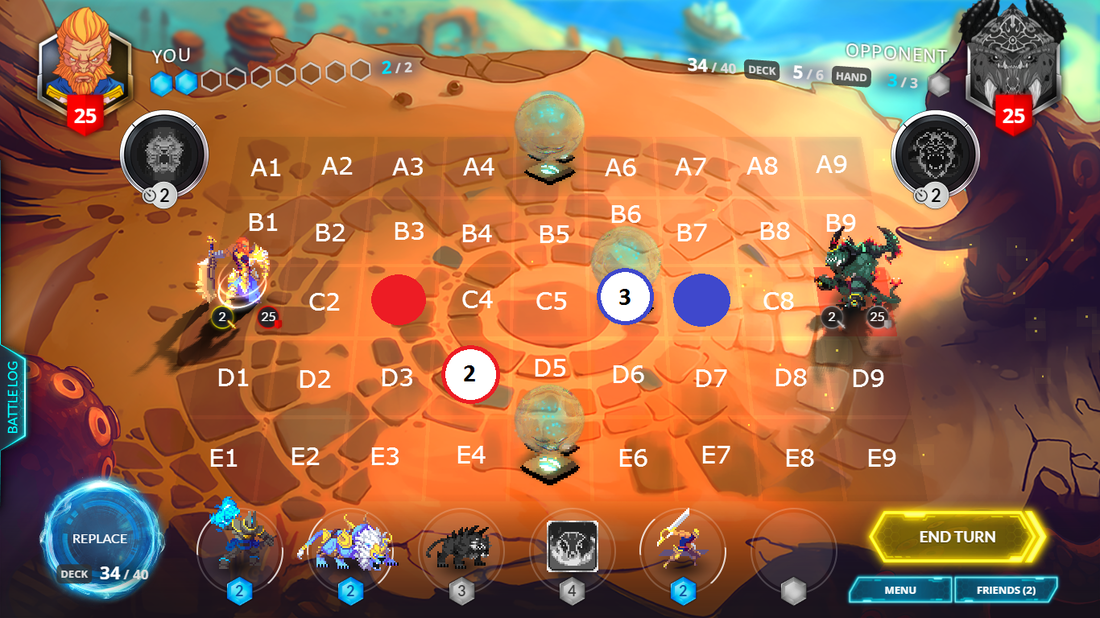
Unfortunately, not all of Player 2's options are as simple as playing a pair of 2-mana minions - you'll often find yourself with a 3-mana minion in hand which is especially powerful against your opponent's strategy (such as Silverguard Knight against aggressive minions), a minion that provides incremental value if you're able to protect it (such as Spelljammer) or simply not have a pair of 2-mana minions in your opening hand. This raises a very interesting question - where should Player 2 position their only minion?
There aren't any options which are unequivocally better that then others, which is why it deserves its own section. I don't claim to be the authoritative opinion on the matter and this section of the article should be considered a guideline rather than written in stone. Placing your minion directly onto the mana spring without spending that mana is generally a bad idea - since Player 1 already has access to two mana springs on Turn 2 but can't easily prevent you from reaching all three, your opponent has access to equal amounts of mana regardless of whether you deny them the central mana spring or not. Placing your minion on the C6 mana spring also means that your minion can't walk onto either of the mana springs in the following turn, meaning that your opponent is the only player who benefits from any of the mana springs. Placing your only minion vertically above the mana spring on B6 gives you a much wider range of options - your minion can walk onto either the A5 or C6 spring on Turn 2 to allow you to summon a 5-mana minion, while your opponent will be extremely hard-pressed to capture all three mana springs in a single turn. This allows you to match the acceleration that Player 1 gains from claiming 2 mana springs and brings the game back onto even footing, but it has serious potential for disaster. If Player 1 moves their minion from D4 to D6 (vertically beneath the C6 mana spring) and moves their general to B4, they can claim both the A5 and C6 mana springs by summoning minions directly on top of them. The 2-mana minion standing on D6 prevents your opponent's general from getting close enough to the E5 mana spring to contest it - unless Player 2's minion can move from B6 to C5 and destroy Player 1's minion on D6 in a single attack, then it's unlikely that Player 2 will be unable to contest the E5 mana spring. This gives Player 1 the opportunity to monopolize the mana from all three mana springs - while this isn't a game-ending sequence of plays by any means, it certainly puts Player 2 at a notable disadvantage. The third option is simply to concede control over the mana springs entirely - if the incremental value from your 3-mana minion is high enough or you simply want to avoid endangering your general during the early stages of the game (which is especially common for certain late-game strategies), then you might choose to move your general to B8 instead of C7 and place your minion diagonally onto A7. This means that your minion can move onto the A5 mana spring unless your opponent chooses to contest the mana spring (which they can easily do), but cannot be immediately attacked by Player 1's general. This position also means that any Provoke minions which your opponent places on the A5 or C6 mana springs (such as Primus Shieldmaster or Silverguard Knight) cannot trap your general in melee range, allowing Player 2 to retreat or advance as befits the situation, and cannot trap your minion if placed on the C6 mana spring. Chakri Avatar (which permanently gains +1/+1 whenever its controller cast a spell) is a minion which particularly benefits from this third approach. By preventing your opponent from killing or locking down your Chakri Avatar on Turn 1, you can either choose to cast multiple spells and attack with a buffed Chakri Avatar or retreat with both of your units in order to maximise your burst damage off a future Mist Dragon Seal (teleporting your Chakri Avatar next to your opponent's general from across the map). Things only get more complicated from here and it's extremely difficult to make general statements for multiple factions, but understanding the basic strengths and drawbacks of these opening plays should help you evaluate which option is right for your deck in a particular situation and which 3-mana minions might be more suitable for different option. Conclusion
In summary, almost every strategy requires a reasonable number of 2-mana minions to contest the mana springs over the first two turns - Player 1 forfeits an enormous amount of early board control if they can't summon a 2-mana minion on Turn 1, while Player 2 benefits to a lesser degree from having enough 2-mana minions to claim the C6 mana spring and summon a pair of 2-mana minions on Turn 1.
4-mana minions are the pinnacle of early-game efficiency and the second pillar supporting the majority of midrange decks, since Player 1 and Player 2 can both plan to consistently summon a pair of 4-mana minions on Turn 2 and Turn 3 in order to control the board and blunt their opponent's aggression. Although particular situations may call for spending Turn 2 on answering the opponent's threats and disrupting their win condition instead of developing your own board state, there are few situations where playing the most cost-efficient minion possible on Turn 2 is an incredibly bad idea. Although 3-mana minions often have unique and powerful effects (especially drawing additional cards), they are fundamentally outmatched in combat against a pair of opposing 4-mana minions - this means that they're usually played in order to either access specific niche effects or because you plan to cast them on Turn 2 alongside another minion or a disruptive spell to remove one of your opponent's minions from the board, lending them to aggressive or control-orientated strategies depending on the minion in question. Midrange and control decks can afford to run a higher number of 5-mana minions than average as long as they include other tools to blunt early aggression from aggressive decks. Although 5-mana minions can rarely be played on Turn 2 and therefore reduce your options for a powerful play on Turn 2 (which can allow your opponent to snowball an early advantage), they offer enormous amounts of value in a drawn-out game and can potentially trade with numerous smaller minions with their effects or if left unanswered. 6-mana minions are fundamentally late-game cards chosen to end the game against aggressive decks or create huge leads in a war of attrition, since they can rarely be cast until after both players have already had an opportunity to develop their board state. 7-mana minions provide an enormous trump card against other attrition-based decks but are normally redundant against aggressive decks, which aren't designed to win drawn-out games regardless and aim to kill you before you can exploit your late-game cards. With the number of aggressive decks in the current metagame, very few decks choose to include 7-mana minions and those that do are fundamentally built around dragging their opponent into the latest stage of the game and beating them around the head with their 7-mana minions until their opponent stops twitching. This has been a pretty huge article, so thanks for reading along to the end. In my next article, I'll examine each of the main deck archetypes in Duelyst (aggro, midrange, control, tempo and combo) and explain how different cards are naturally designed to be included in different archetypes. I'll then move on to examining the basic Golems and use them as a baseline for the expected stat distributions for minions at each point on the mana curve, as well as explaining some of the important thresholds in particular stats (such as why 2/3 minions are usually stronger than 3/2 minions) and generally providing all of the contextual information needed to evaluate the neutral minions in your early collection. This prepares us nicely for the end of the series, where we'll be examining all of the notable neutral minions at 1-2 mana, 3-4 mana and 5-7 mana respectively. See you in the next installment, and have fun playing Duelyst!
5 Comments
Ardent Dawn
24/7/2016 09:09:43
I'm glad you enjoyed the article! I plan to continue after I've finished my exams in August :)
makeinu
24/7/2016 13:00:33
Good luck with your exam!
makeinu
14/9/2016 10:44:52
Thank you to complete this article Leave a Reply. |

Our GuidesOn Turn 1 Mystic, we aim to teach new players how to climb to Gold Division as soon as possible, then from Gold Division to S-Rank as soon as you're interested and have time. Archives
November 2016
Categories
All
|
 RSS Feed
